
Presets are a professional tool that every photographer needs in their belt. Not only do they help speed up the editing process, but they’re a game-changer for making images look good side by side in a single click.
That said, rarely will anyone just turn on a preset and consider an image complete. While that may be the ultimate goal, it’s rarely achieved. But they’re the perfect starting point during the editing process.
Personally, I like to add presets to all of my images as soon as I import them. Usually, I split the scenes up based on the light they were shot, and then apply presets that work best with the light.
Different times of day have different contrasts and colors that they produce in an image. For example, at high noon, the light can look flat and boring. So I’ll use a preset that warms up the image and increases the contrast. During sunset, the light is the most contrasty. So I use a preset that opens the shadows and decreases the highlight. This will produce as much dynamic range as possible so that I have all the detail available to work with. You can learn how to get even more detail out of your camera by using HDR techniques.
[twenty20 img1=”1931″ img2=”1927″ offset=”0.5″ before=”Before Presets” after=”After Presets”]
What can presets do for my photography?
With the exception of flagging, starring, and labeling, presets can do anything Lightroom is capable of in the Develop Module. A user can make their own utilitarian presets to accomplish simple things, like auto-leveling photos, sharpening, turning on profile corrections (so long as your lens has autofocus), removing chromatic aberrations, or cropping to a specific aspect ratio. If you set up your photos like this every time, it makes sense to make a preset that contains these changes so that you can do everything with a single click, or even on import, rather than make them yourself on every photo.
But presets can still do much more! Many photographers use presets to emulate film. This can be done with any number of changes, from increasing the black point to give that washed-out look, to going in and radically changing colors in the calibration, HSL, and color profiles. Some presets can make hours worth of changes appear on your image in a single click. They’re one of the most powerful tools at your disposal, and they’ve absolutely worth investing time into.
How do I use presets?
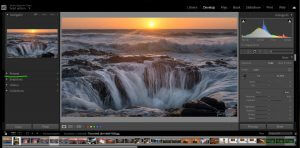
When you’re in the Develop Module, your presets will appear on the left-hand panel, underneath the Navigator. The navigator is the smaller image on the top left corner, used to help you see where and how much you’re zooming in on the larger image in the middle.
If you don’t have any presets, Adobe will have their stock presets loaded. These presets are simple by nature, and only change settings in the basic editing panel. The Adobe presets are a good place to start learning how to edit your own images to see what each of the sliders in the basic editing panel can do for your images.
That said, there are thousands of more advanced presets out there that can completely change your images. Many photographers have built their own packs that make images look like film, make images look like nighttime, sunset, or otherwise make images beautiful and unique.
I’ve also made my own professional preset pack designed specifically for landscape photography. These are the presets that I use in my everyday workflow to achieve the look and feel of my images.
How to import, load and manage new presets
 If you’ve downloaded a new set of Presets, installing them in Lightroom is very easy.
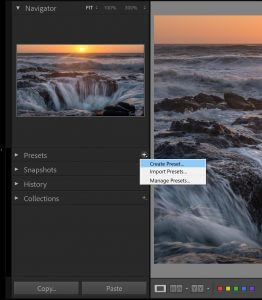
- Go into the Develop Module in Lightroom
- On the left-hand side, click the Plus Button next to Presets
- Scroll down and click Import Presets
- Find your preset pack in a .zip folder, and click Import
Once you’ve gone through those steps, your new presets will appear on the left-hand side underneath the default presets. If you’d like to remove the default Adobe presets, or just get rid of the ones that you don’t use:
- Go into the Develop Module in Lightroom
- On the left-hand side, click the Plus button next to Presets
- Scroll down and click Manage Presets
- Uncheck the Presets that you want to remove
[twenty20 img1=”1930″ img2=”1926″ offset=”0.5″ before=”Before Presets” after=”After Presets”]
How making your own presets can help make sales
Once you’ve got a handle on your lightroom workflow, and have learned how to use the program, it’s time to start experimenting with making your own presets. Over time, you’ll start to develop an editing style. Having a cohesive library is what will set you apart from all the other photographers on Instagram, and other places.
If you look at the top accounts, many of them only publish photos that look good next to each other. This can mean using a similar color profile, or only publishing photos from a certain time of day. So if you’re loving shooting in the evenings during the golden hour, it’ll make sense to develop a preset that captures what you love about those images. Then, when winter comes and the light starts changing, you might switch to shooting at Blue hour, or later, nighttime. But keeping a catalog of photos that showcase that change can be the difference between getting extra likes, or followers.
That said, in the real world, many people don’t care as much about Instagram metrics for success. But having a cohesive set of images will also make your work more attractive to publishers and prospective buyers. When you’re putting a book together, there has to be a theme. Sure, the contrast between images can be really powerful, but it has to be intentional to be impactful.
How to make a preset
Go to your favorite image in your catalog. If you scroll through the history on the left side of the Develop Module, there could be hundreds of changes that you’ve made. Even if you got it perfect in-camera, there is always work to be done in post. The greatest photographers in the film age all had a professional darkroom where they made amazing changes. And the digital age, while it may be easier, is no different.
So, once you’re on your best image, there is a simple workflow to make that stunning work repeatable over and over again.
Here’s how to make your own preset:
- Go into the Develop Module in Lightroom
- On the left-hand side, click the Plus button next to Presets
- Click the first option, Create Preset
- Check the options that you want the preset to contain
- Rename the Preset to a descriptive name of your choice (can be renamed later)
- Press Create
It’s truly a simple process to create a preset. But some are more powerful than others, and some of the options in that list will make headaches down the road. In the next section, I’ll give advice for creating the most user-friendly presets.
Advice for getting the most out of your own presets
When creating a preset, there are some options that will get in the way of future edits. Take, for example, cropping. If you cropped your photo to a specific guide, like the golden ratio, or the rule of thirds, including that crop into your preset probably won’t work for other compositions. So I typically leave the image uncropped.
Next, my favorite presets to work with change the image contrast but leave the basic panel for me to make changes. Every image has a different histogram, with subjects in different kinds of light. So a powerful preset that can be used in every situation has to work in every situation. The best way to do this is to use the curves panel to make specific types of contrast. Then, for color changes, instead of making them with temperature and tint, make them in HSL, Colour Grading (previously Split Toning), and Calibration.
In the short term, this process does take extra work. But If you keep that basic panel empty, they’ll serve you so much better in the future. Because you’ll be able to make quick changes to the images that need them, instead of spending hours making tiny tweaks.
Experimentation is key. Over time this process will become simpler as you discover what kind of edits you like, and what you don’t.
What’s next?
If you want to learn more about my process, and how to get better photographs with the equipment you already own, come take part in my free web class! In it, I’ll show you my east, four-step system for taking fine-art landscape photographs in every situation. The class is totally free and has tips that I’ve learned and developed over my award-winning career as a landscape photographer.