
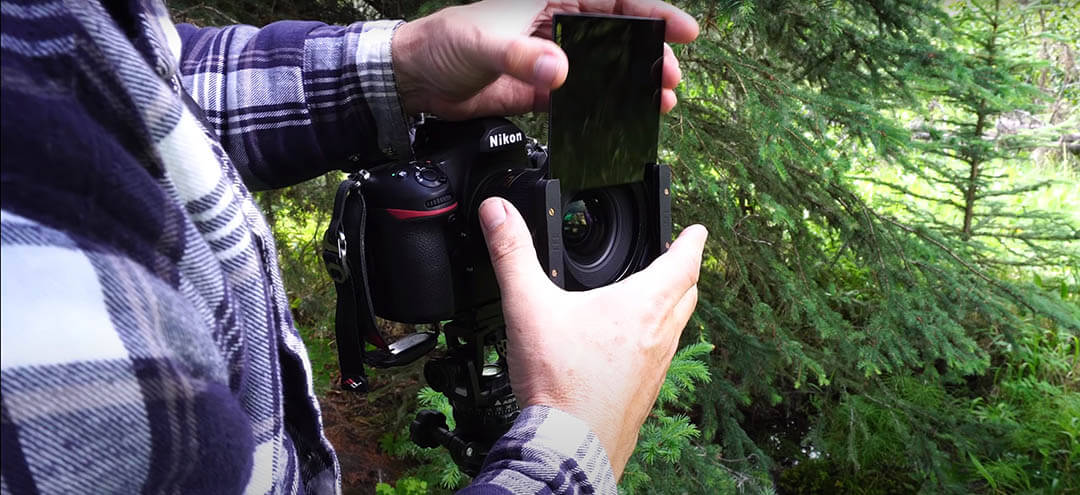
If you’ve recently come back from your first trip out with a new set of ND filters, one of the first things to jump out will likely be the horrendous colors that are taking over your images. Even top-of-the-line ND filters will create a color cast in your images. Luckily, these are usually fairly easily taken care of in Lightroom. So how do you get rid of ND Filter color casts?
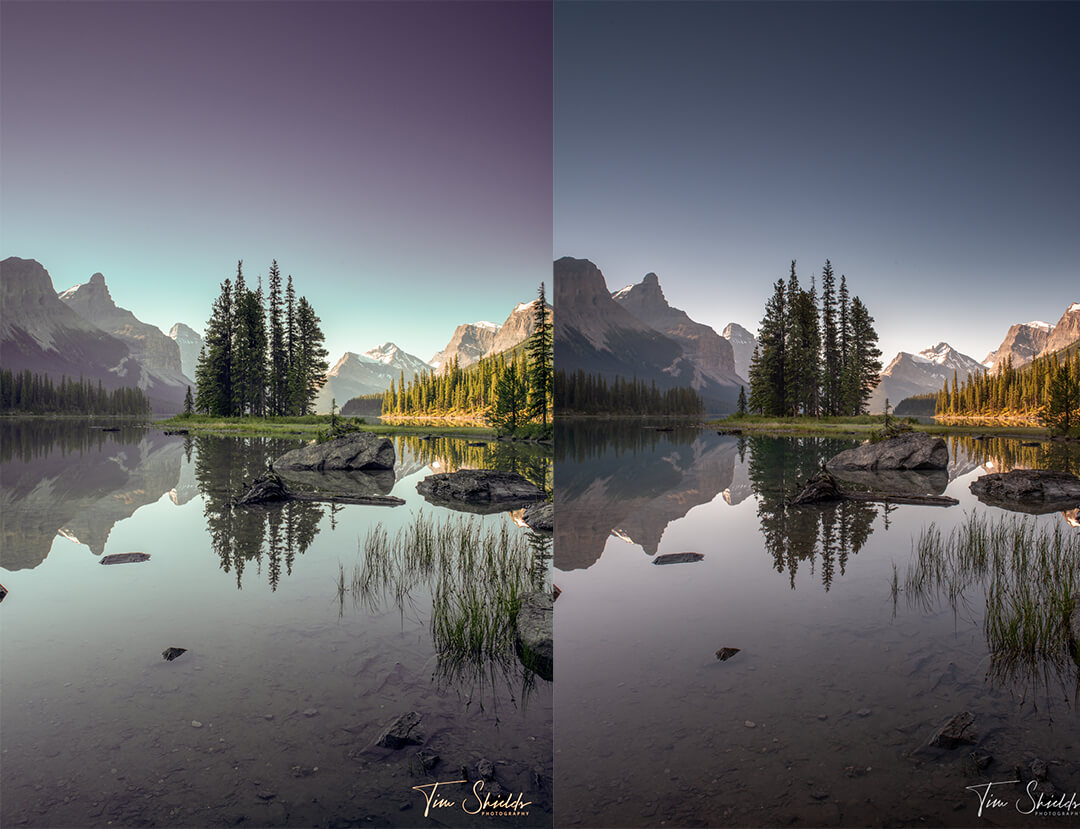
The easiest way to remove the color cast from an ND filter is to use the Auto White balance selector in Adobe Lightroom. Select an area that should be white, like a cloud, or the rapids in a stream to automatically adjust the white balance. After this, you may need to make some minor tweaks to get the right balance.
This process is fairly straightforward and will give you good results most times with a couple of tweaks. If you took multiple photographs to make a panorama, make sure to adjust the white balance before combining the photographs.
ND filters can be forgiven for leaving horrific color casts on your photos. These filters are annoying, somewhat fragile, and ludicrously necessary for creating stunning images. It’s truly a shame that cameras can’t have negative ISO values so that I wouldn’t have to bring these with me. But until they do, I will keep ND filters in my bag.
The quickest method for removing color casts
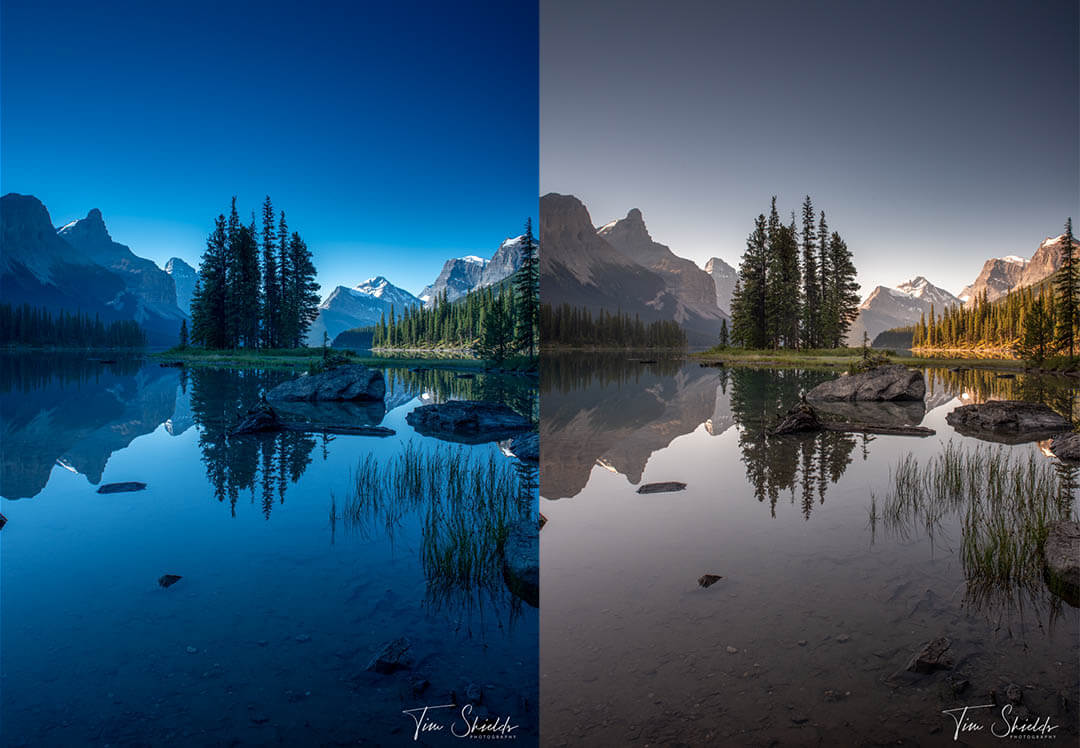
In the image above, I used the Lee Big Stopper, which is well known for creating a deep blue cast. Every ND filter makes a color cast of one kind or another. But the blue casts made by LEE Filters are some of the easiest to correct in post-processing. Here’s the set that I use on B&H.
It doesn’t always occur in my images, but it typically happens when I need to make panoramas.
This is because I always check my settings before putting on the ND filter. All the images have to have exactly the same white balance and exposure to make a panorama, so it’s a good practice. But that often results in these kinds of casts, because it’s difficult to set the balance when you’re seeing the image through a really dark screen.
When I get into Lightroom, the easiest way to remove the color cast is to start by using the white balance selector. This can be found in the basic editing panel in the Develop Module just below the histogram.
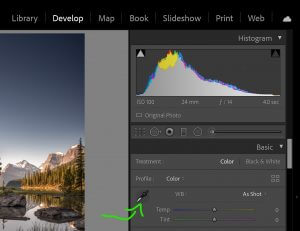
The tool looks like an eyedropper. When you click this, then move your mouse onto a position that has a good amount of what should be white, or neutral (read: grey) colors. Lightroom will take a 5-pixel by 5-pixel sample of those colors and automatically change the white balance so that those pixels move as close to grey as possible.
It’s best to choose a grey color in the mid-tones, which is one of the many reasons photographers often bring along a grey card to make sure they’re getting the most accurate colors possible.
These simple, cheap tools do make post-processing a little easier. But in most cases, Lightroom does a really good job without a grey card. But I always have to further adjust the white balance to get it just right. Sometimes it makes the image too magenta, or too yellow in an effort to make a blue sky grey.
Raw VS Jpeg files with ND filters
The automatic tools in Lightroom and flexibility of raw films allow color changes to happen non-destructively. But if you try to make these changes on a Jpeg file, you’re going to run into some problems like I did in the example above. Jpeg files are not as editable as raw photos, and changing the white balance can have some deleterious effects on the image.
The issue comes down to compression. Colors take up a lot of information in a photo file, so jpeg compression algorithms remove them to reduce the size of images seen on the internet. So when you make a large change to white balance on a jpeg file, the tones will not be affected evenly like they are in a raw file. This can make large color shifts from ND filters unrecoverable in many cases. So it’s always best to check that you’re shooting Raw before taking your photos!
Of course, these compression algorithms have been used since the mid-90s, and there are much better algorithms that have been created since, but humans and coders don’t like change. Maybe in the future, we’ll be able to use compression algorithms on DSLRs that are becoming common on cell phones. But until then, shoot raw.
Why do ND filters cause color casts?
Neutral Density filters are created to reduce the amount of light that enters your lens. To do that, they have to shade all of the light that comes through. But the issue is, that it’s really difficult to make a dark filter that isn’t made up of a certain color.
The color black occurs when there is so much color that no light can pass through. But ND filters have to let some light through in order to be functional. If you were a photographer back in the film days, you’ll have seen the soluble colors that were layered onto the back of 120 films. These were ND filters that stopped light from bouncing in the back of the camera that would reduce the sharpness of images on the film. But all of these backing layers have their own colors — Kodak Portra is green, while Ilford films are blue. On the film, they were all black — they just used different formulas to get there. Separating black ink from a pen in water will do exactly the same.
So that means they have to be made up of one color or another. The good ones are as close to grey as physically possible, while the cheaper ones typically show a magenta cast — which is far more destructive to the colors passing through.
The easiest way to avoid these casts is to use Auto White Balance when possible. But cheaper filters may cause casts that aren’t as easy for the cameras to adjust for as the more expensive ND filters.
Which filters have the worst casts?
The general rule is the denser the Neutral Density Filter, the worse the color cast will be. A 10-stop filter will have more color blocking material than a 3-stop filter. Stacking filters creates an even larger cast.
But there are two things to really watch out for when you’re selecting ND filters. Many people are enticed by variable ND filters because they allow you the flexibility to change the amount of light getting into the camera with a single filter. Truly it’s a fantastic marvel of engineering.
In reality these filters don’t evenly block out light across the frame. When shooting long exposures with the darkest part of the variable ND filter, you might start seeing a large X across the image. This effect is almost unrecoverable in post-production, even if you’re shooting raw files. If it’s just across the sky, it might be possible to correct it by spending a day in photoshop. But that time is usually better spent out taking more photos in the mountains.
The next piece of advice is to not mix different brands! As mentioned earlier, some filters have a magenta cast, some have blue casts, and some are more green. But when you mix these filters together, those casts combine and can have some ugly effects on the image. You’ll find some tones are more muted than others, and that might require some extra time using HSL to bring back different parts of the spectrum.
What’s the next step?
 A little more knowledge always goes a long way. These articles provide everyone with some actionable tips to help them along their photography journey. But when you’re ready to take photography from a hobby to a career, you’ll need something a little bit more. To help make this content full-time, I created a number of classes that’ll teach you the secrets that I have learned over the years to take stunning, fine-art landscape photography! I went from a regular, beginner hobbyist to landscape photographer of the year using my simple, 4-step method. Learn more about it by signing up for my free online web class today! Come get started learning with the tips that I’ve learned when making my best images. And you’ll also come away with some free ebooks and guides that I made especially for newer photographers.