
The Artificial Intelligence-powered Sky replacement tool is one of the greatest new features in the latest version of Photoshop. If you haven’t updated yet, you should. The simple tool can flawlessly replace a drab sky with a dramatic one in under 2 minutes.
[twenty20 img1=”1877″ img2=”1891″ offset=”0.5″ before=”Before Sky Replacement” after=”After Sky Replacement”]
Is sky replacement cheating?
While you might see authors out there who think this is bad for photography in general, I personally think this is one of the best, most inspirational tools available. Tools like this reduce the barrier to entry for photography. And that’s an all-around good thing for the industry!
I’ve helped so many close friends pick out their first cameras, I can’t even keep count anymore. But the ones who stuck with it and kept taking photos — that’s a much smaller number. And I think a big reason for that is that they begin to realise how much time and effort goes into this craft.
So tools like this can help newer people get inspired to learn more, and keep up with the craft instead of letting their cameras collect dust. Personally, I think this is a beautiful thing. Photography has taken me around the world. It’s an art form that has let me experience so many amazing moments that I wouldn’t have otherwise. And I love helping and seeing others get to that same level!
As well, more people in the industry means more ideas! Everyone looks at the world differently. And they might just pioneer new styles and techniques that we haven’t even thought of yet. So let’s cheer the team at Adobe on for making waves like this. They’re making our jobs easier and helping people get into the industry.
And let’s be real. If you’ve used the program for more than 10 years like I have, you’ve probably done this process manually at least once. So the only real damage is that you wasted so much time doing this in 2017.
How to get started
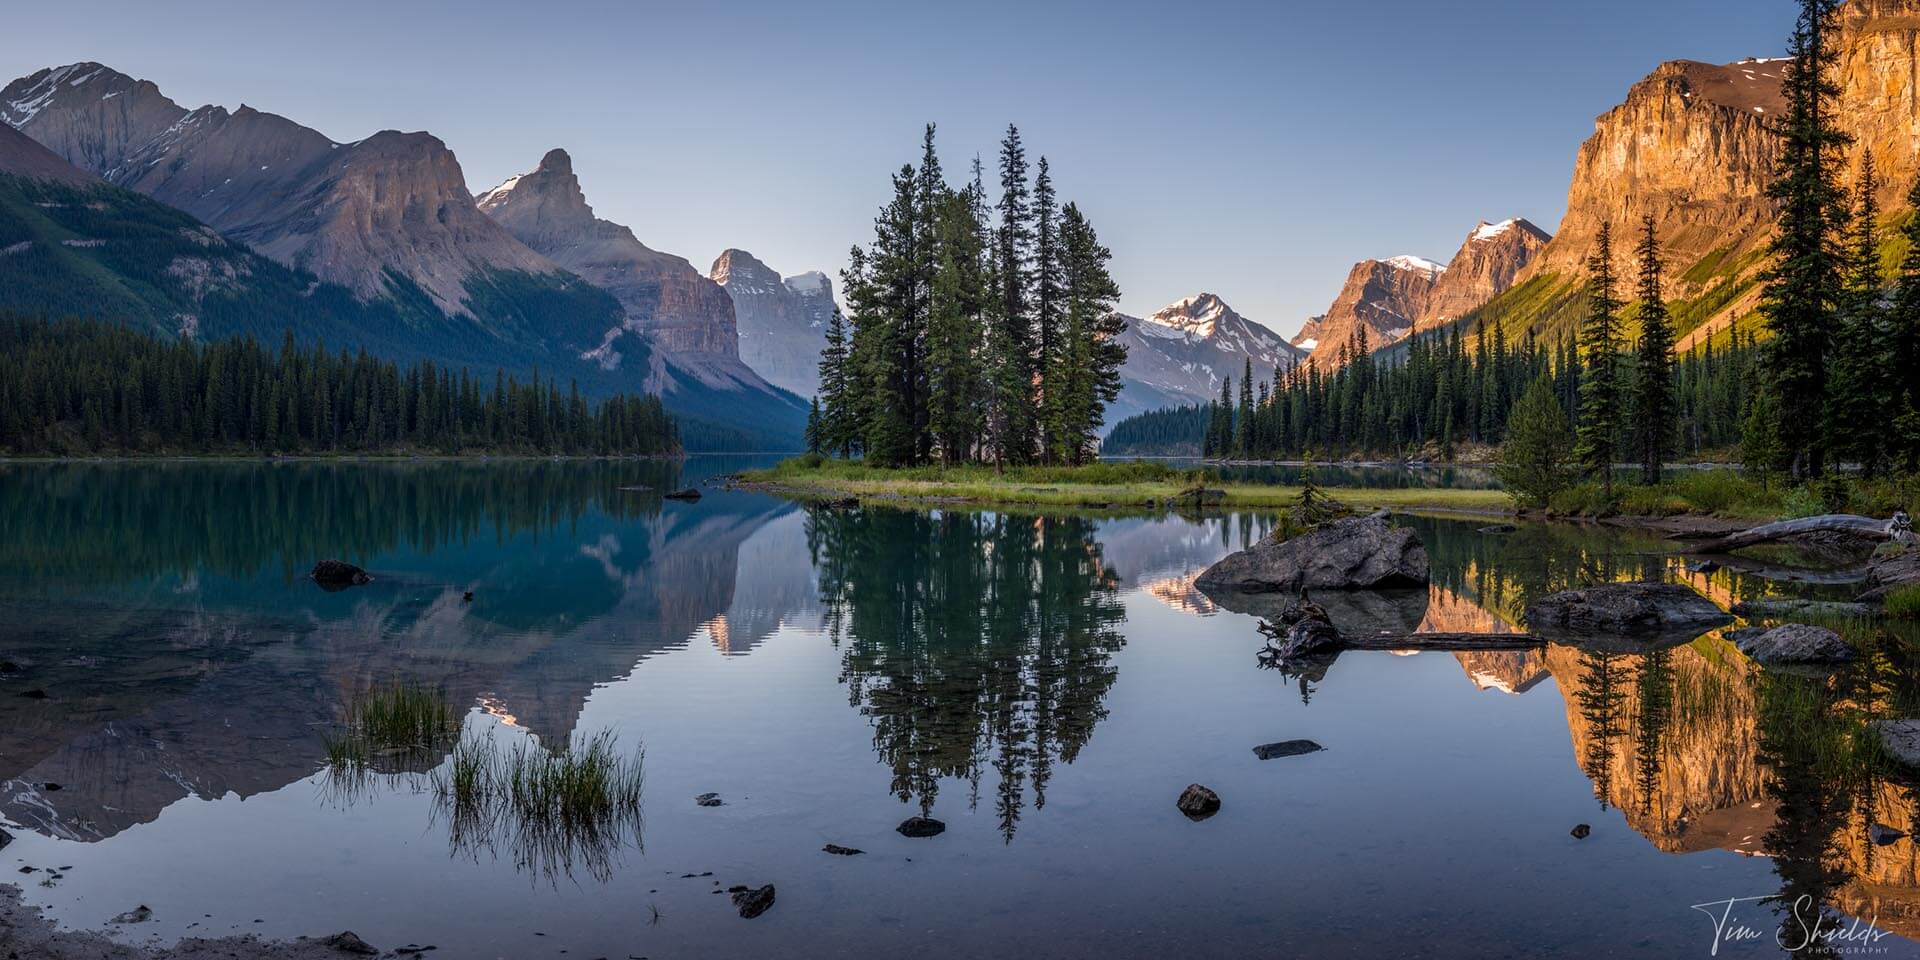
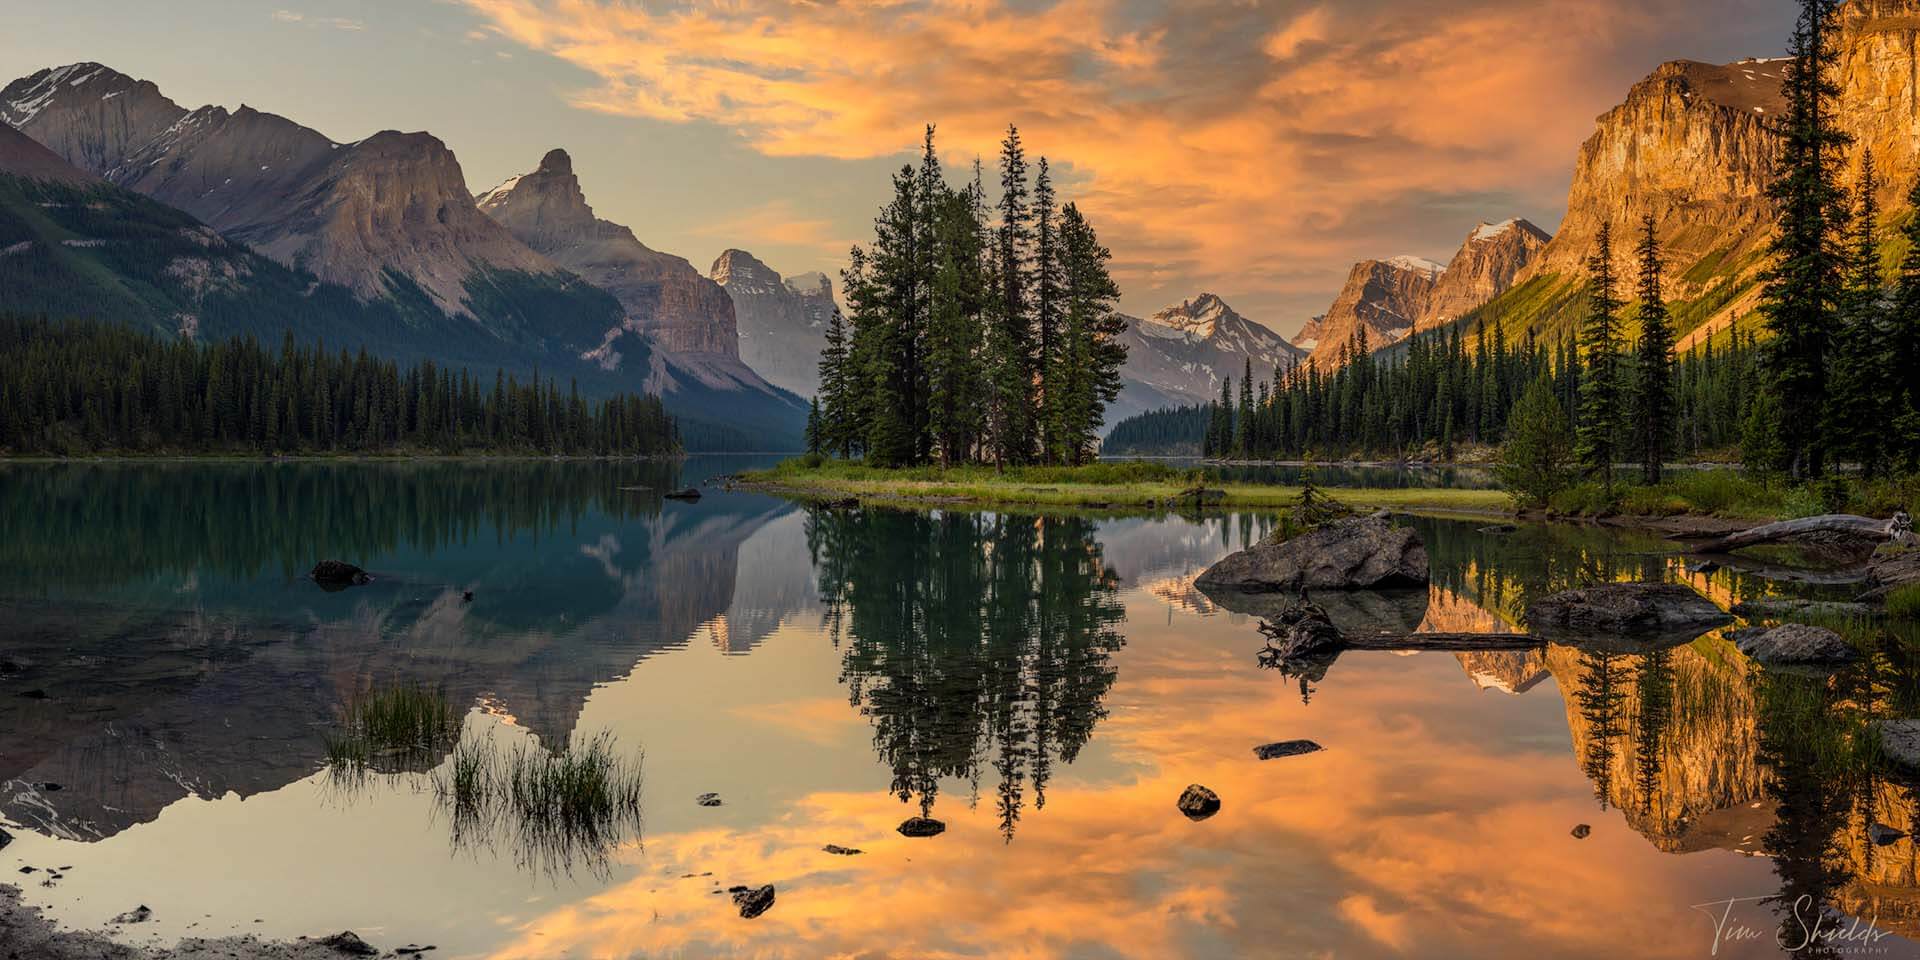
Choose a photo with a bland sky. A cloudless sky can still be beautiful, but why not spice an image up with some extra drama? For this lesson, I’m going to use the image above and replace to sky to get that wow factor.
This my favourite that I’ve taken from Spirit Island in Jasper National Park. It’s one of those landscapes that people dream of taking, but it can be tough to get there. For one, Jasper National Park, unlike Banff, is far away from major centres. And this particular sight requires a 4-hour canoe trip! Luckily for tourists, there’s a canoe rental on the lake, but to get there for sunset or sunrise, you’re going to be canoeing one way in the dark.
Import the image into photoshop
 Using Lightroom to open the file in Photoshop is the best way to ensure you’re editing the highest-quality image possible. Especially if you might want to print the file down the road, editing in Photoshop using a Raw file will give you the maximum flexibility and best results.
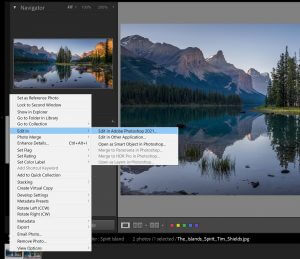
Open Lightroom Classic, simple right click the image, and choose edit in -> Photoshop 2021. A dialogue box will come up asking if you want to edit the original photo, or a copy. Choose edit a copy with Lightroom adjustments. This way, the photo will look the same in Photoshop as it does in Lightroom. And when you go back to Lightroom, you’ll have the original file and a .tif or .psd file with the Photoshop adjustments to compare.
Replacing the sky
Once your photo is in Photoshop, the first step is to make a copy of your background layer. When you have the background layer selected, press Control or Command + J. Alternatively, you can click and drag the layer you want to copy down to the little plus button underneath the layers.
Make sure the new layer is selected so you can see the changes happening live. Then you can replace the sky quickly and easily by going to Edit, and selecting Sky Replacement. You’ll come to a new menu with a bunch of different options. I’ve selected a couple of key options marked with these symbols:
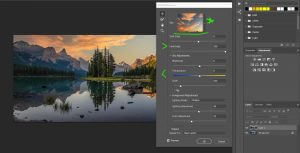 * You can choose a different sky by clicking on the image of the sky.
> Fade Edge can be used to soften the edges of the replaced sky if you notice they look a little funky. This will feather the effect, making it look more realistic if it isn’t already perfect.
< The Temperature adjustment will tone the image foreground. For example, if you’re replacing a mid-day photo with a sunset shot, you will want to increase the foreground colour temperature to match the brilliant sky.
How do I use Sky Replacement with a water reflection?
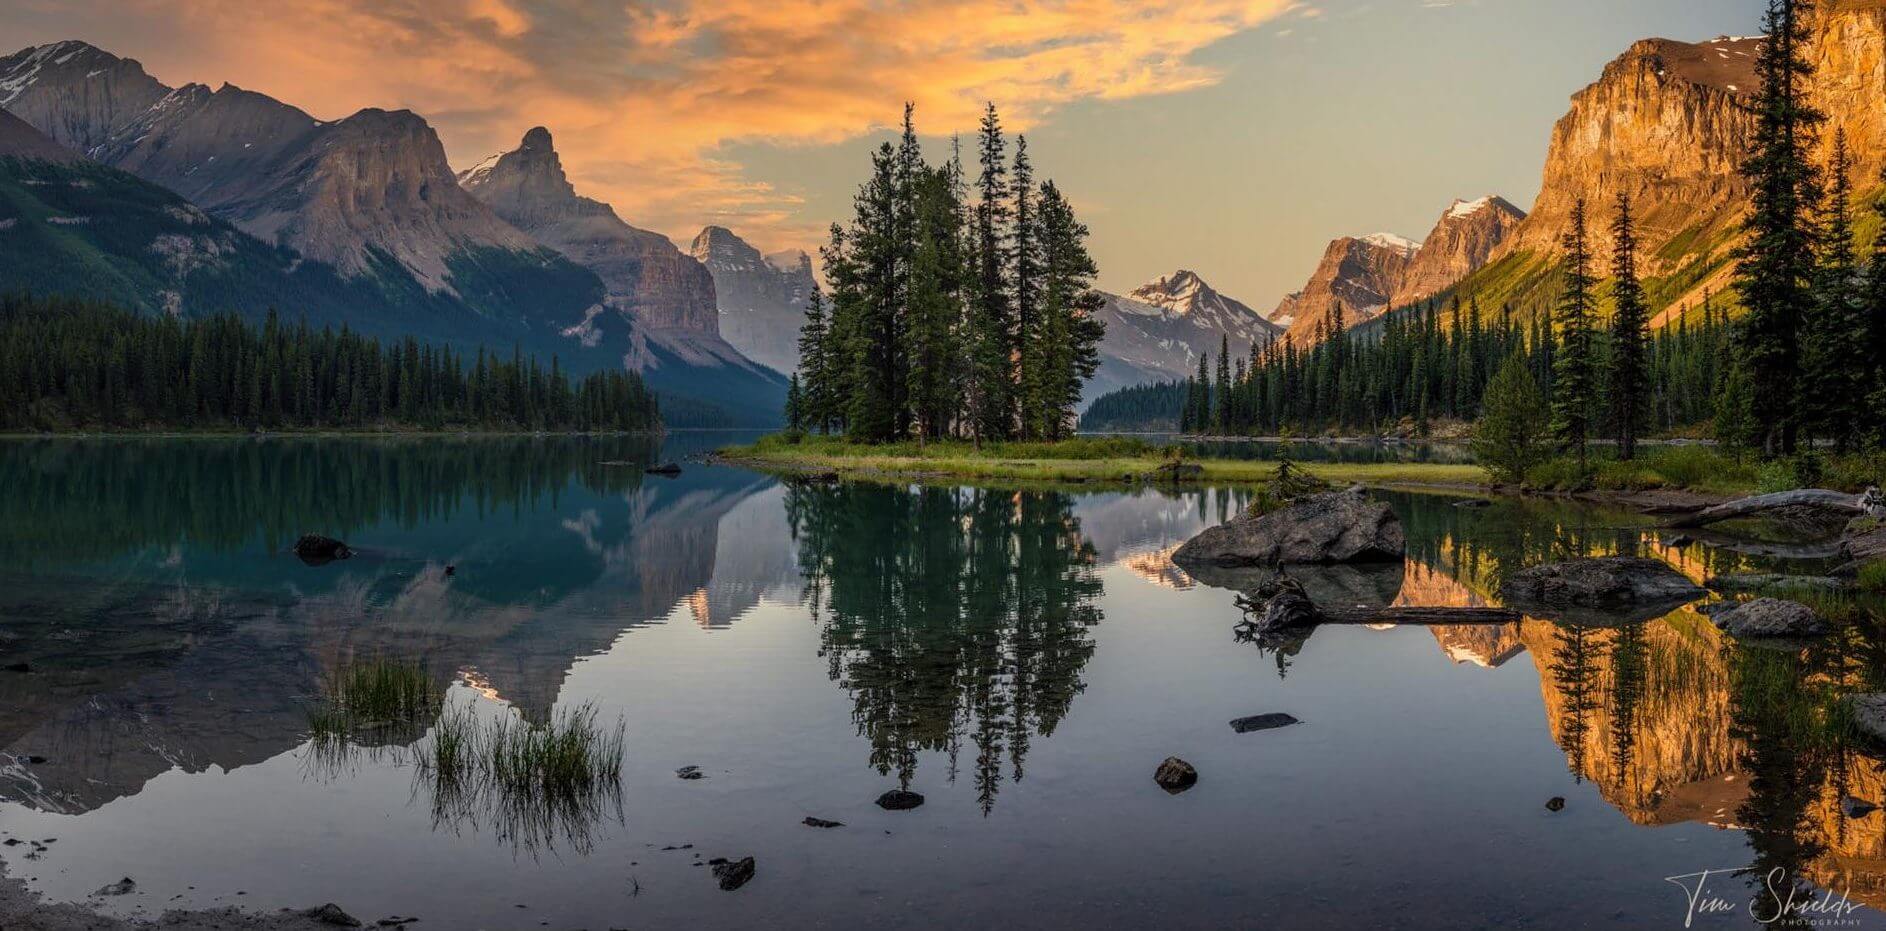
I know many of you noticed that this image is looking a little bit funky. It’s got a brilliant sky now, but the water is still oddly reflecting that midday glory. Not to worry! There’s an easy fix here.
- Reset the image, or simply delete the new sky layers. Make sure there’s a copy of the background layer.
- Flip the image vertically. Go to Edit -> Transform -> Flip Vertically
- Re-run the Sky Replacement action with your desired sky
- Select and merge the background copy with the new sky replacement layers
- Flip the image vertically again
- Run Sky Replacement using the same sky as last time.
The reason why I do the bottom half of the image first, is that I’m more likely to have to make blending changes on the top part of the image. The reflective foreground is busier, and so the changes are a little more subtle. If I need to make changes to it, I can always create a layer mask in Photoshop and make some blending changes using a brush to slightly bring back the original layer.
But overall, this new AI-powered tool is essentially flawless. Even with the trees, it does a way more convincing job than I’ve ever been able to do by hand.
And that’s it! You should now have a beautiful new sky in both the foreground and the background of your image! I’d love to see the sky replacements you’re making to your own images. If you’re as excited about this feature as I am, send, or tag me in your photos on Instagram, and I’ll feature the best ones here.
Where can I learn more?
 If this quick tutorial was helpful for you, I’ve got a lot more great material in-store. One of my favourite lessons to teach new photographers is my 4-Step System for taking stunning landscape photographs. I’m giving this away and more in my free online webclass! Sign up today to learn this simple method that’s helped me take award-winning landscape photographs.