
I’m a landscape photographer. I’ve taken tens of thousands of landscape photographs, and I’ve screwed up so many of them that I made myself an acronym checklist so that I will remember exactly what my camera’s settings should be. Technology in every other aspect of our lives has become so automatic that users don’t even have to think about how they’re used. Press a button, and take an amazing image on your iPhone that’s edited and ready to post on Instagram before you even see it.
Professional digital cameras are not even close to this easy. Some of the modern mirrorless cameras look like they have about 1,000 different settings, and millions of possible combinations. And forgetting that you made a change to one of these settings could ruin your photos beyond repair. Sometimes it makes me wish to go back to shooting film, when there were only five or six settings maximum on a camera, so there was no chance of ever messing them up.
So here it is, the acronym that has saved me thousands of times over the years.
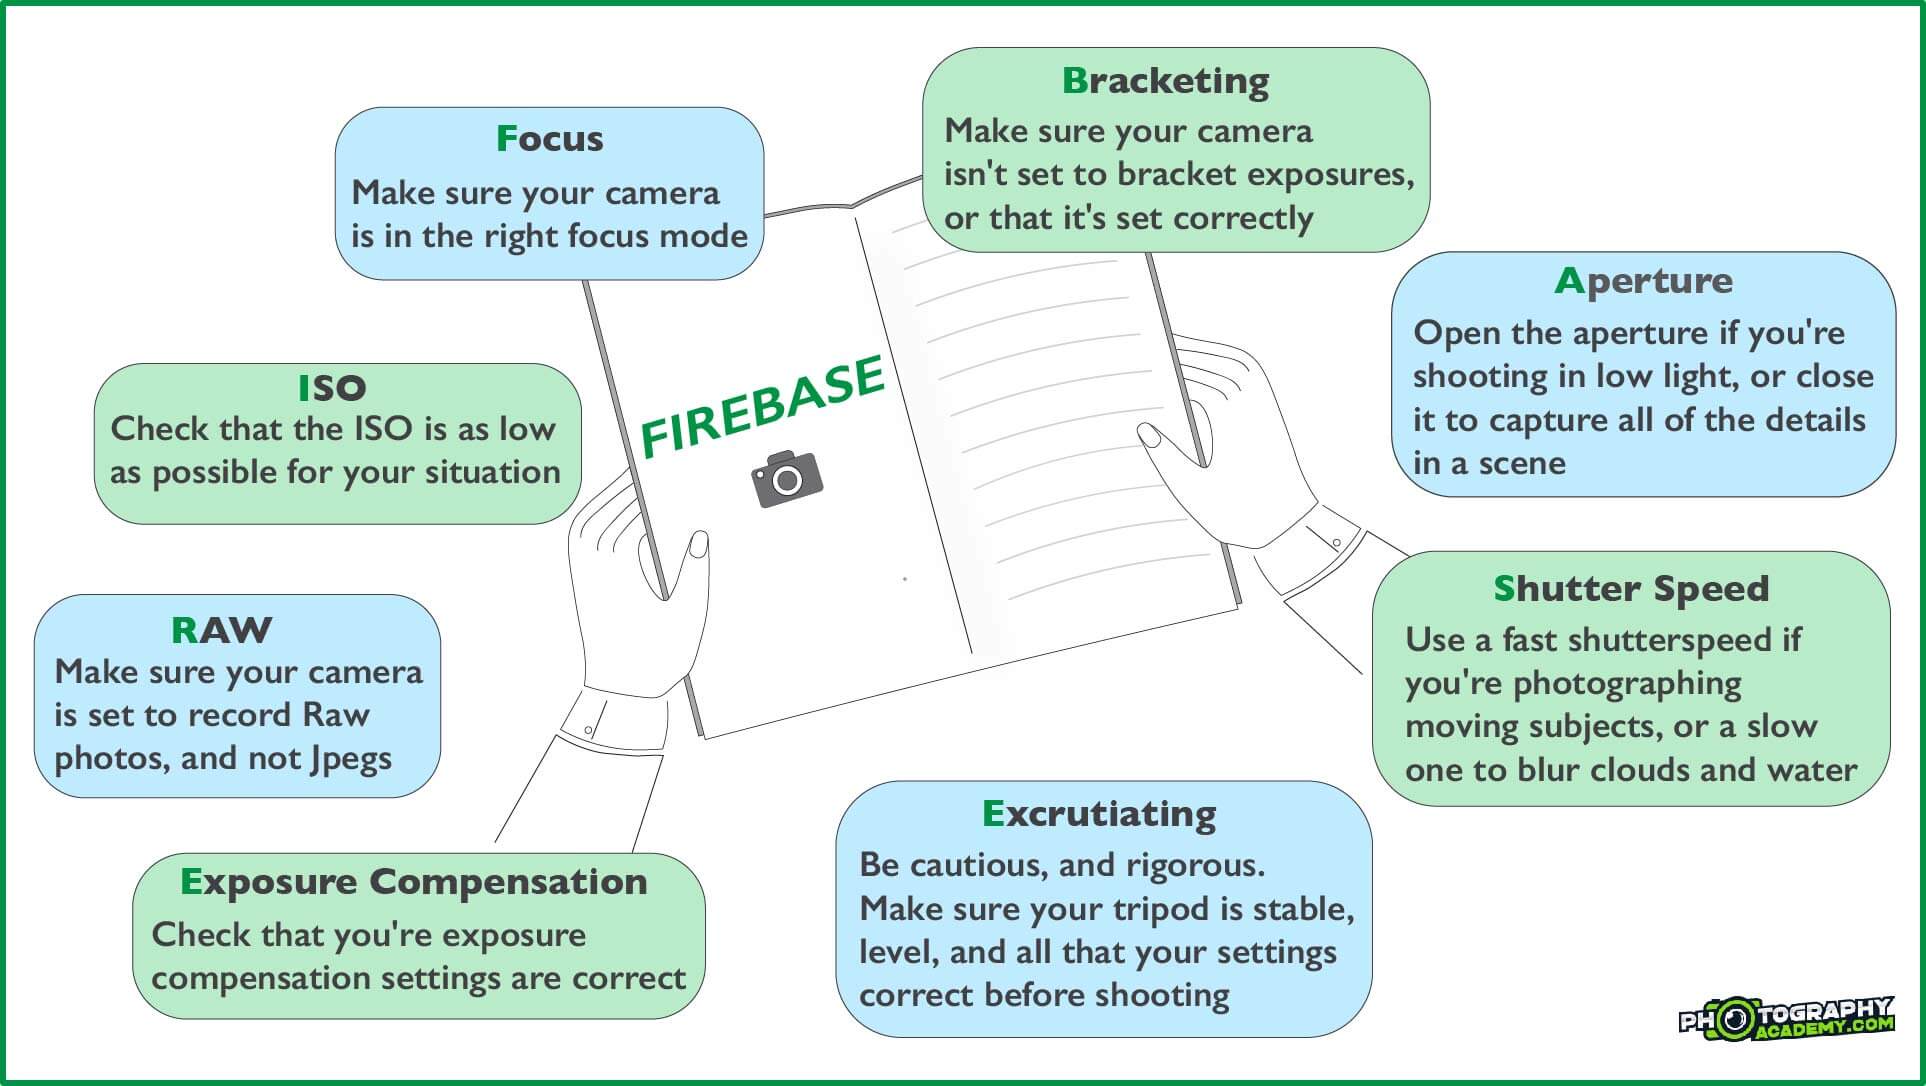
FIREBASE Camera Settings Checklist
F is for Focus. Make sure that your focus point is correct in the scene. When you’ve set up your camera for an ideal composition, you need to make sure that your focus is set in the right spot, and that it’s on manual or autofocus, depending on what you’re doing. Something that’s happened to me more times than I can count, is that I’ve been out shooting the stars at night, when it’s too dark to use autofocus. So I put my camera in manual focus, and use Live View mode to find the brightest star in the sky.
When I put the camera back in my bag, the focusing ring on my lens will move just the slightest bit. So then when I’m setting it up in the day time, I might forget that autofocus isn’t on, but the image looks sharp so I don’t think twice about it. In fact, the D850 is so quick, that you might not even think twice about it. But then when I get back home, or to camp and take the images off my SD card, they’ll be ever so frustratingly out of focus. And that’s just never a fun moment. So check that your camera is in the right mode before you take that shot.
Don’t take unnecessarily grainy images
The I is for ISO. Make sure that your ISO is nice and low, or at least it’s the ISO setting that you want. Sometimes I shoot event photography, and the light can be changing so fast in the room that you need to adapt on the fly. Well, I have a bad habit of increasing shutter speed every time it’s too bright, and increasing the ISO when it gets dark again. There’s been more than one occasion where my ISO accidentally got boosted up over 9,000.
The shots weren’t ruined, but it meant that I had to turn a few more black and white than planned. The easy way to avoid this, is to be constantly thinking about the changes you’re making instead of running on autopilot.
The R is for Raw photos. You’re going to lose photos if you camer is set to record JPEG, and get to a scene where you really need that extra flexibility. If you don’t just always leave your camera shooting RAW, it’s going to happen. Always check to make sure the camera is in RAW.
E is for Exposure Compensation. Make sure EV, or Exposure Compensation settings have been zeroed and turned off. If you’re shooting in any kind of automatic mode, exposure compensation will help you deal with changing light. Just take the photos, and let the camera do the hard work. At least that’s the promise that we were all told. In reality, if you set your camera to over or undercompensate, then you might catastrophically blow out the highlights.
The one setting I ALWAYS forget to turn off
The B in the FIREBASE checklist is for bracketing. Are you using bracketing or are you not using bracketing? Make sure that your bracketing is turned off if you don’t want it. Bracketing is an extremely useful tool for shooting HDR landscape images. But if you forget that you had it on the last shoot, it might just come back to bite you when taking wildlife shots. Bracketing automatically takes a different exposure each time you press the shutter. So the first shot will be properly exposed. But the next will be under, and the third will be over exposed. It’s really fun when you’re capturing an eagle catching a fish, only to find the best shots are incorrectly exposed. Save yourself, and add that B to the list.
The A is for aperture. Make sure your aperture is set for the scene that you’re shooting. I usually go for a small aperture opening from F/8 to F/13, since that’s where I know my lens will be the sharpest. I’m typically not worried about bokeh quality, since I’m capturing all the details in a scene, And really, if I want to, it is possible to blur certain parts of the image in Photoshop or Lightroom. But there’s no way to make an image sharper.
If you’re shooting something darker, you’ll likely want to open the aperture. But having the aperture open as wide as possible can result in unsharp corners. Every scene will require something different. Be sure it’s set properly before it’s too late.
The most important part of the FIREBASE checklist
The S is for shutter speed. This one is really important. If you go from photographing a landscape to birds in flight, running horses, or other quick animals, you’re going to have to make sure your shutter speed is up to the challenge. There’s nothing worse than coming home with an image of a blurry jumping mountain goat. It’s so easy to just set it and forget it, letting the camera do all the hard work in the automatic modes.
But why would you even want to use lower shutter speeds? I’ve got an article explaining how using a tripod can make some amazing photos here.
And finally, the E is for excruciating. Make sure that you pay excruciating attention to detail because if you don’t, then you’re going to get home. You’ll upload the photos into Lightroom or Photoshop, and be upset at yourself. Like I have been hundreds of times when I screwed up by not having my settings perfect. So before every single photoshoot, I think about Firebase and check every setting to make sure I’ve got it all right.
Checklists like the FIREBASE acronym are extremely useful for complicated tasks like this. In fact, pilots, doctors, and engineers all use checklists every day. So when they’re using complicated equipment, they can be sure they’re not missing steps. And if the smartest on the planet are using this technique to make sure they’re not screwing up, I’m definitely going to adopt it into my practice.
Where can I find more checklists and handy tips?
 I’ve got many resources that are ready for you if my Photography Cookbook. A chef can prepare another’s dish using a well-written recipe. With this cookbook, any photographer can replicate my secret photo recipes. I’ve developed it over my years as an award-winning landscape photographer. And I’m very excited to be able to share it with all of you.