
Wide-angle lenses are surprisingly difficult to use. I’ve seen people talk about them on blogs like they’re the secret weapon of every single landscape photographer, but in my view, they’re great at some things, and really bad at others.
A wide-angle lens is most useful for exaggerating perspective in landscape photography. Wide-angle lenses elongate features and make close objects larger while further objects become smaller in the frame.
The main reason that I don’t use wide angles all that often is because they make everything distant look small. If you’re photographing mountains at the end of sweeping plains, a wide-angle lens will turn those mountains into molehills. But there are of course many places where they’re simply the best tool in your kit.
I’ve carried around my 24-70 f2.8 lens for years, because it’s the perfect wide-angle zoom lens. I rarely need to take photos wider than 24mm, And 70mm at the telephoto end is perfect for stitching together panoramas that show amazingly detailed scenes. But the best part is that it’s a tack sharp lens even when taking photos with a wide open aperture. In this article, I’ll show you my greatest tips for getting the most out of this lens, and how I choose which focal length for the scenes that I’m shooting.
[twenty20 img1=”2754″ img2=”2762″ offset=”0.5″ before=”What it looks like in Reality” after=”What it looks like with a Wide Angle Lens”]
What is a wide-angle lens?
At its most basic, a wide-angle lens is any lens that has a wider field of view than the human eye. In reality, wide-angle is typically referred to as any lens 35mm or wider on a full-frame camera body, or 24mm on APS-C cameras.
Ultra-wide angle lenses are those wider than 24mm on full-frame, like the 16-35mm f/2.8 lens for Canon, or the 14-24mm f/2.8 on Nikon cameras.
These lenses produce a field of view that is wider than a human’s natural field of view— even when accounting for peripheral vision. For landscape photography, these lenses are incredible tools that allow you to capture sweeping landscapes that include the foreground all in a single image. Which is one of the main reasons why they’re so loved by photographers and viewers all over the world.
What scenes work with a wide-angle lens?
When people are first starting out with photography, they often think the perfect lens for the job is a wide-angle. That’s usually the first piece of equipment that people rush out to buy — whether it’s the 24-70, or even the wider options, like 16-35mm or 17-40 f4 depending on your kit. And these lenses are fantastic to have, but I often find that people don’t know how to properly use them to take stunning photographs.
There’s something to be said about being able to get everything in the frame. But there’s a point where there’s so much in the frame, that there’s no focal point. This is what you have to avoid.
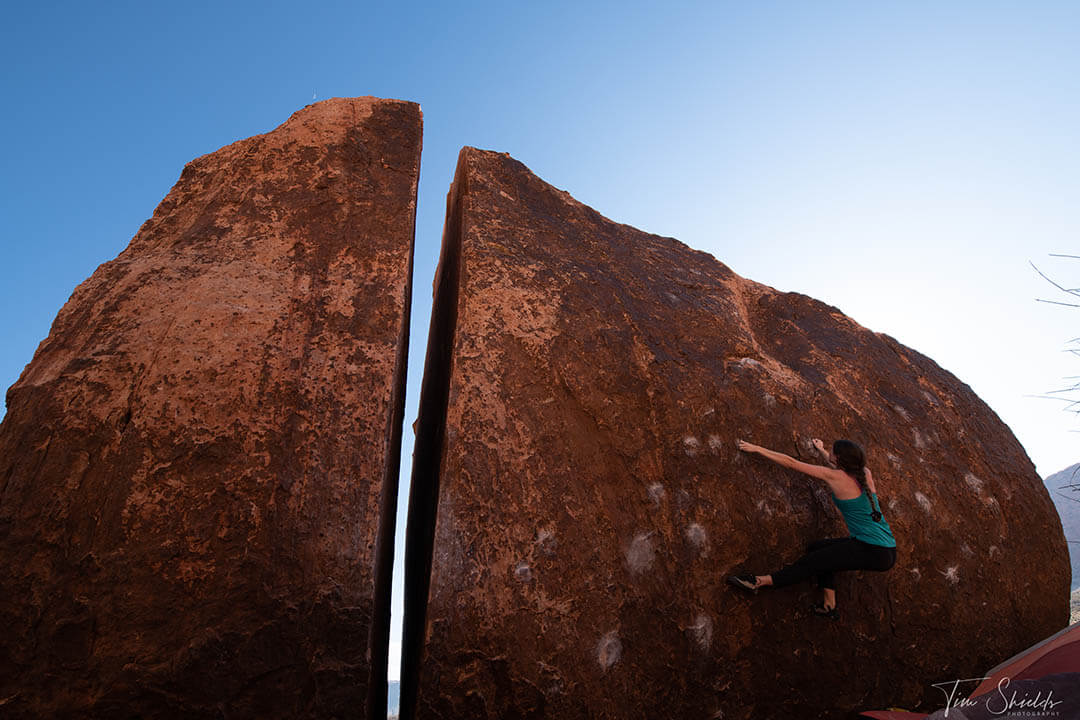
Wide-angle lenses work best when you can get close to your subject, and still want to see the foreground and background. Take a look at the rock climbing image above. I took this photograph in Nevada, and the wide-angle lens is the reason it looks so dramatic. The lens elongated the rock, making it appear much taller than it was in person. But it also had the added effect of making the climber appear smaller as they moved further away.
This effect is used all the time in advertising. Think about shoe commercials, where the photographer makes the shoe look huge. But then the runner, despite being much larger, takes up only a fraction of the frame in comparison. Taking the same photo with a telephoto lens would make the shoe appear proportional in size to the person wearing it.
Another common example is in Antelope Canyon and the grand canyon lookouts. In these cases, getting low with a wide-angle lens will make the ridges look absolutely massive.
What’s the best way to use a wide-angle lens?
Most people use a wide-angle lens to capture more of the sky. But that’s not the best way to use a wide-angle lens.
By far the best way to use a wide or ultra-wide-angle lens is to capture the foreground along with the background. Especially in cases like mudflats, fields, or beaches, where you want to capture as much detail as possible in the foreground.
By angling down your wide-angle lens, you’ll be able to capture enough of the foreground to give the viewer a sense of place. A sky photo can be taken anywhere in the world, but the ground in front of you is what varies.
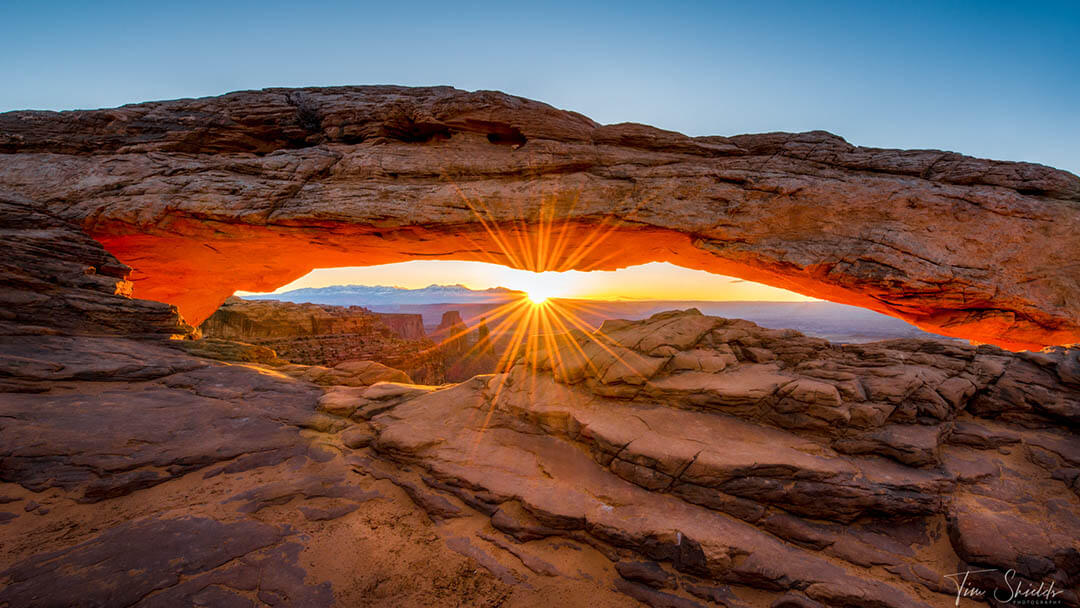
Taking photos this way at sunset or sunrise will create more drama in the photo by elongating the shadows. These shadows provide contrast along with the textured areas of the foreground, by darkening one side and highlighting the other. See the image of the Mesa Arch at the top of this section for an example of this effect, where the sunrise light accentuates this foreground.
[twenty20 img1=”2749″ img2=”2750″ offset=”0.5″ before=”Reality” after=”When you want to add in a little extra drama”]
When your image needs that touch of drama.
When should you put the wide-angle lens away?
Wide-angle lenses are not useful when your subject is far away. The only exception to this rule is if you’re in the Dakotas and your subject is the sky. This is because even the largest objects in the distance will look small when using a wide-angle lens.
So if you’re on top of a hill, and are trying to get an image of a sweeping landscape, a wide-angle lens will actually be more of a hindrance than a help. For one, the image may get crowded if there aren’t leading lines, defined subjects, or other shapes that add contrast and bring viewers into the image.
You need to make sure when you’re making that composition, that it actually has some substance. What pulls your attention into this scene? Is there a ridge, branches, a fenceline, or something that’ll lead your eye to that object? If so, find a way to use those lines and emphasize your subject. If you can’t get close without breaking the leading lines, then you’ll need a longer focal length to bring that element closer to you.
One of my favorite examples is desert photography. This is a case where the wide-angle lens seems like the most obvious choice. But the fact is, you need to capture details and drama. And while there’s plenty of drama in the desert, it’s very difficult to see with a wide-angle lens. That’s why I always use a telephoto lens when I’m in the desert — it allows me to make the backgrounds look larger than life. Yet, wide-angle lenses make these same dunes look like anthills.
What problems do Wide-Angle lenses create in landscape images?
At this point, we’ve gone over the best times to use a wide-angle lens, but we didn’t get into one of the most obvious downsides of these pieces of equipment. Wide focal lengths often create distortion in the image. Now, the higher-end versions like the 16-25 f2.8 have gotten way better over the years, but the corners will always be less sharp than the center, and the lines on the outside of the lens tend to get a bit curvy.
I edited architecture photos for a couple of years, and this was the biggest issue that we encountered over and over again. You need high-quality images of small spaces, which is where a wide-angle is supposed to shine. But you can only correct these images so much.
When you’re photographing city streets, the curvature in the lens becomes even more apparent. Get up close to a park bench to frame your image, and the middle section of the back might be slightly bent at a weirder shape than it should have been. You can sit there getting it just right for hours, but tiny fluctuations in your position will create unfixable issues. It’s not as bad as fisheye lenses of the early 2000s or GoPro-level, but it’s just enough to be annoying.
Of course, some people want these curves in their images, because they can create drama and interesting textures that wouldn’t be there any other way. Here, as always, experimentation is key.
How to get a wider perspective with a longer focal length
So at this point, you’re probably wondering how you can fit everything into a frame using a longer focal length. Because let’s be real, there are thousands of compositions out there where you need a wider focal length to really make it shine. But if the subject is too small, it won’t be appealing. And if you’re too zoomed in, there’s nothing to really draw the viewer in, right?
The good news is that it’s an easy issue to fix. All you need is a good, sturdy tripod, and create panoramas. This is actually a technique that I use all the time in my photography because it solves both problems — get telephoto results with a wide field of view.
The main thing to consider when you’re taking a panorama photograph is to turn off all automatic settings. You need to keep the same white balance in every image. And the exposure settings like ISO, shutter speed, and aperture cannot change — otherwise, you’ll end up creating a patchy image.
When your camera is steady and level on the tripod, take the fist image in the center of your frame. Then pan the camera to the side, overlapping the previous image by 25-30% so that it can be easily combined in Lightroom or other software. And take the next shot. You can also tilt the camera so that you create an image in a more regular aspect ratio. Some photographers also put the camera in portrait orientation so that they get more vertical real-estate per photograph. This can reduce the number of times you have to tilt the camera, which is where you’re more likely to make errors.
This technique does require a lot of practice to get right! I recommend first trying it through your bedroom window, or close to home. That way you don’t mess up an epic sunset because you forgot to turn off the automatic settings!
What’s next?
 If you want to learn more about shooting panoramas to get past the issues with wide-angle lenses, I created a helpful Youtube video on panoramas here. My YouTube channel is filled with a large variety of content. On the channel, I talk about my photography adventures, as well as a number of tips that are great for beginners and even advanced landscape photographers.
But when you’re ready to really get down to business and jumpstart past all of this, I have a number of photography courses that show you all of the techniques that took me from being an amateur to winning Landscape Photographer of The Year back in 2017! You can start these courses by signing up for my free web class. Here you’ll learn about my 4-step process for creating fine-art landscape photography and even get access to my free ebook!