
I look for symmetry in everything. If you look at my photographs, this is one of the most distinctive styles that I use in just about every composition. And it’s because I, like most people, enjoy the look of a balanced photograph.
A balanced photograph is when there is an equal presence on the left and right side of the image, as well as on the top and bottom. Balance draws a user into an image and keeps them looking all around it.
Think about the way that you look at an image. First, there’s something beautiful that draws you to stop scrolling past it on Instagram. Next, there has to be enough interesting details in the image. And if it satisfies that, you’ll maybe get closer. You’ll look at the foreground, the sky, the corners, and any spot on the image that has enough details. When I see a photo like this, I’m enthralled by the beauty. And I’ve learned a few techniques over the years on how to find compositions like this.
1. 1/3rd foreground 1/3rd subject 1/3rd sky
This is a very typical photography style that works extremely well. The subject of your scene is straight on, and it will allow the viewer to feel like they’re in that moment of time. If you’re in the mountains, it’ll look something like this. The grassy plains going up to the mountain will lead the viewer’s eyes towards the mountains in the middle. The edges of their peaks will act as leading lines, bringing the viewer’s attention to the clouds above.
It’s magnificent. This is the type of composition that made Ansel Adams a well-known photographer because it brought the viewers directly into these scenes. Throw in some sunset light, or the red reflection on the mountain top as the sunlight fades into the night and you’ll have something incredible to take home with you. The sunset light adds contrast to the scene. So when the viewer’s eyes move to the top of the landscape, they’ll have something that holds them there.
The secret to these compositions is having something of interest in every part of the frame. The rolling hills in the foreground, brilliant colors in the sky, or dramatic clouds, and something interesting in the center.
Match the line where the foreground ends with the bottom third line, and the sky with the top third line to follow the Rule of Thirds composition. It’s basic, but it’s common because of how well it works. Our brains love this kind of balance and symmetry.
[twenty20 img1=”2381″ img2=”2000″ offset=”0.5″]
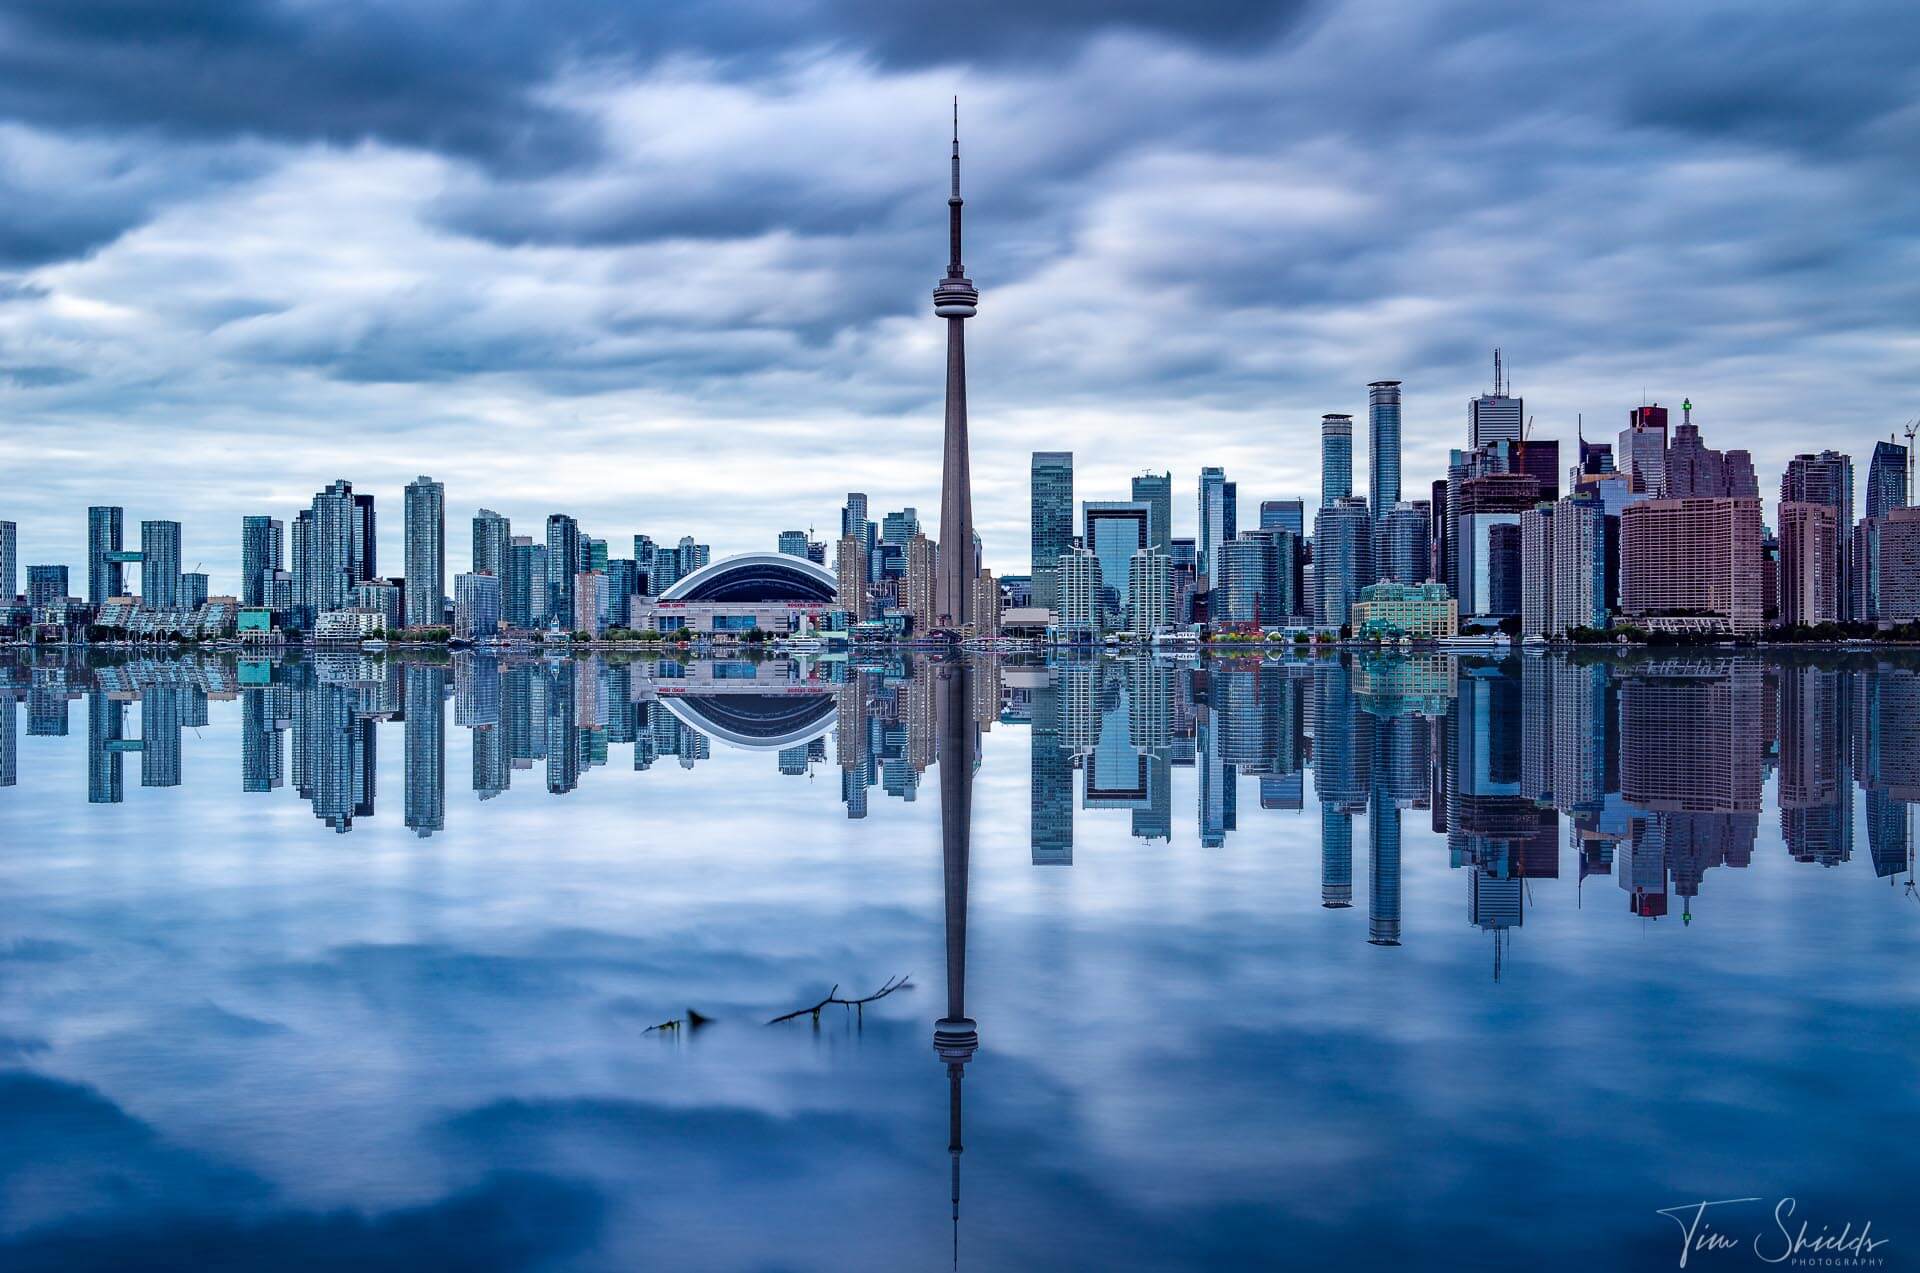
2. Use reflections
Once you’ve got the rule of thirds down, it’s time to up your game. Many of my photos that have won awards have water reflections in them. Typically from a still lake, but I’ve also used puddles and even the ocean to add reflections to my photographs.
The secret to a good reflection is still water. You need to find a body of water that is sheltered from the wind, or wait for the wind to die down completely. Even a small amount of wind can make some reflection-destroying ripples. Both of these scenarios are difficult to find in nature. But the one rule is smaller bodies of water are less affected by wind than large lakes. This is because there’s not that much space for the water to build up momentum.
If the water is choppy, it’s still possible to get a reflection. You’ll notice the image above isn’t a perfect reflection. To get this kind of symmetry in a photo, I use a long shutter speed on a tripod. Usually, 5-10 seconds is enough to get a bit of a reflection going. If you’re shooting in daylight, this might require a Neutral Density filter to be able to have such a long shutter speed, even at the smallest aperture possible. If you’re new to photography, you can read more about exposure settings in this article.
The other way to get rid of the ripples is to plan your photograph for the weather. If you’re on vacation, or you have a couple of days off work, it can be a really good idea to check the weather forecasts for wind conditions. There’s one app that I use every time I go out because it gives the most detailed hourly information that I need to get the photo. Of course, these apps are never perfect. But they’ll give you a really good indication of what the conditions will be when you get there.
[twenty20 img1=”2552″ img2=”1849″ offset=”0.5″]
3. Use an alternative rule of composition to balance your photograph.
There are many other kinds of compositions that you don’t learn in school. They’re not as easy to find, but they’ve been used for centuries by painters and sculptors. One of these rules is the Golden Ratio. Also known as the Fibonacci spiral. This is where the subject of a photograph is further to one side, or in a corner of the frame. Then, using the elements in the frame, you’ll draw the viewer’s eye from the subject around the entire image.
People use this type of composition all the time without even knowing it. If you have an image of a beach, or a river, where the subject starts in the bottom corner of the frame, and moves its way across the opposite corner. The golden ratio can also take place in images with multiple subjects, one being more prominent than the other.
Images that are following the golden ratio aren’t balanced in the traditional sense. But when you look at a photo, one small section of the image carries the same weight as the rest of the photograph. The large subject gets most of the focus, but the background and the other features within the scene get just as much attention and make the subject actually stand out.
This is an important concept in photography and art in general. The parts that are not the main focus are just as important as the subject itself. People love to blur out a background in order to make their subject pop out. But the blurred out background plays just as big of a role as the object you’re trying to show.
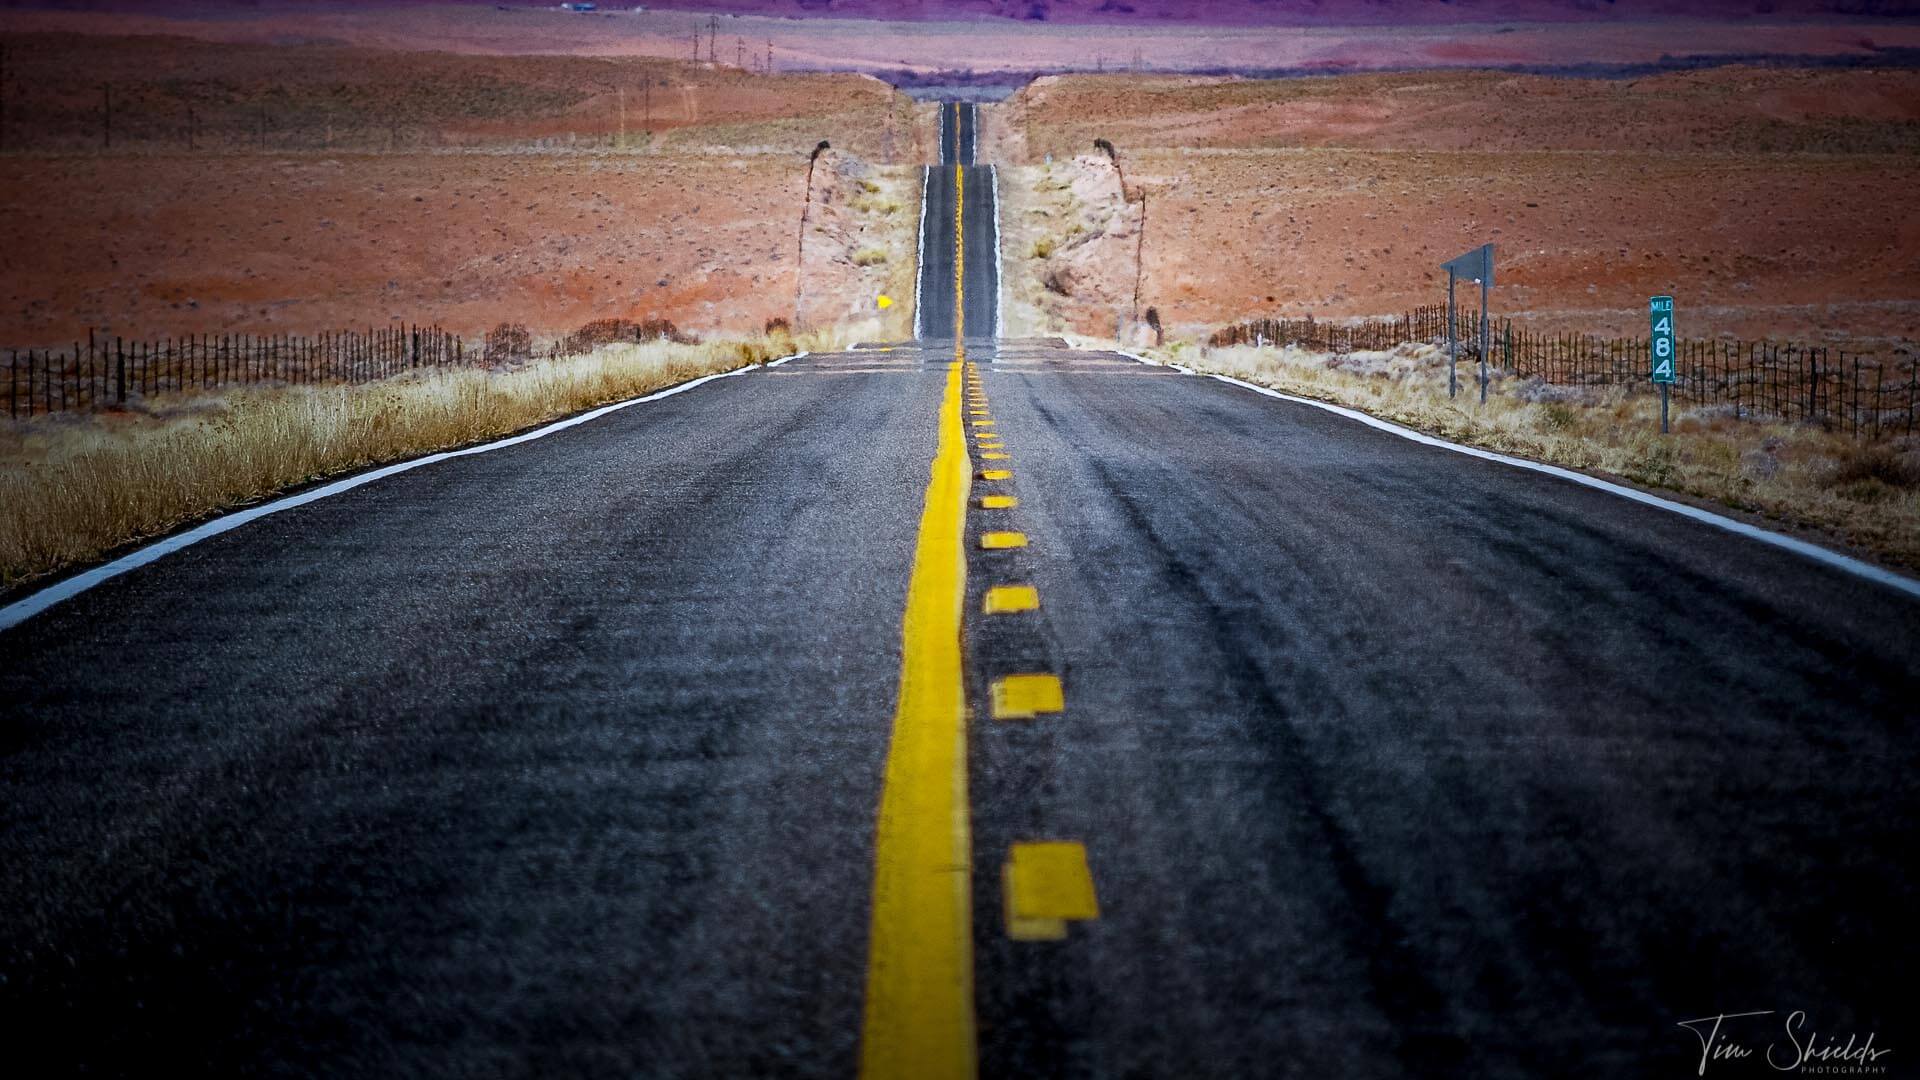
3. Use converging lines to balance an image.
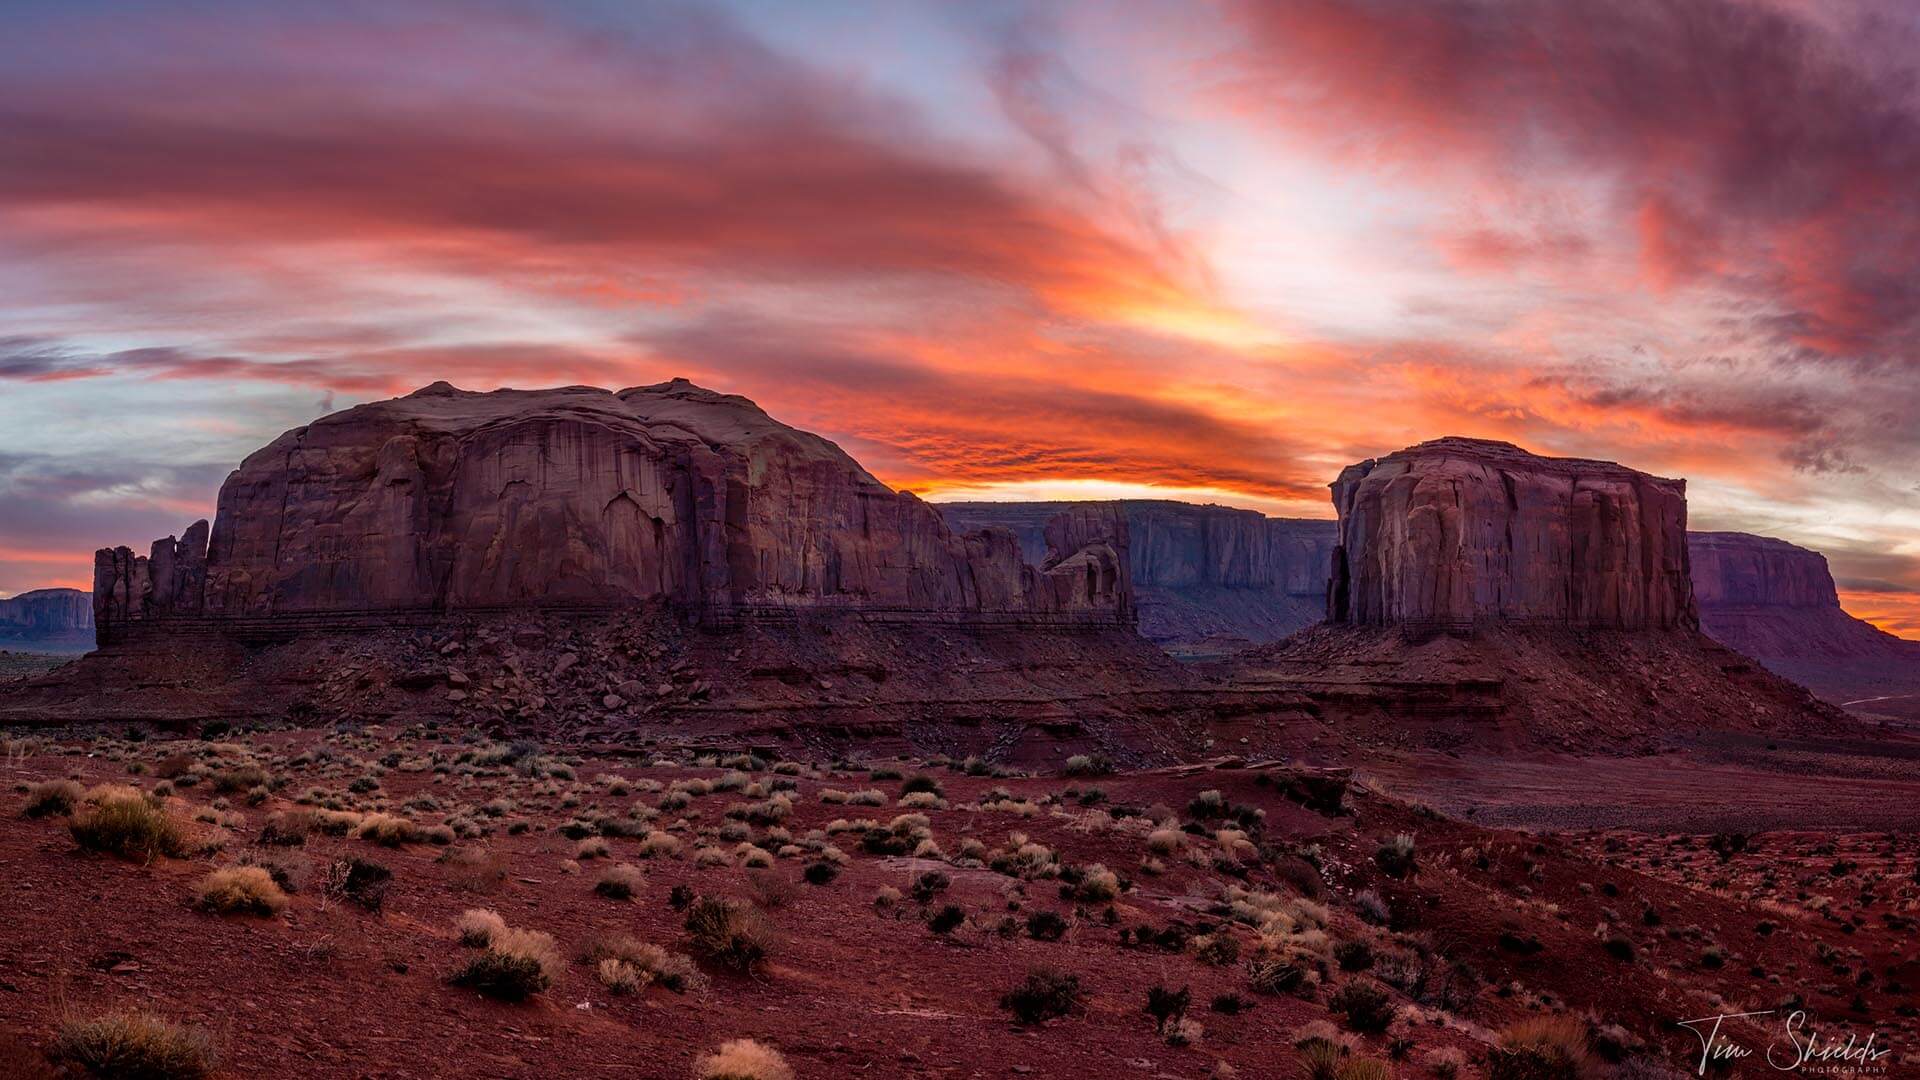
This is another photographer’s favorite, and I’m sure you’ve seen examples of it everywhere. Above is an image of Death Valley. A park famous for its dangerous heat, desert life, and endless vistas. When you take a photograph of a long road like this, the lines on the sides of the road converge into the center of the frame and lead the eye from the bottom to the top. Usually at the end of the frame is a subject, like the desert valley monuments shown here.
In this case, both the left and right halves of the image are completely balanced. They don’t have a subject in them, but they hold your attention on the long black road and all of the accompaniments on the sides.
Many people find these same type of converging lines using train tracks.
The secret of the converging lines is to use a long focal length. That way, the background becomes larger in the image, and the lines on the road converge into an arrow closer to the subject.
4. Cropping and straightening images for composition rules
There are tons of gatekeepers out there who will tell you it’s not a good photo if you didn’t get it right in Camera. And as an award-winning photographer, I’m here to tell you that they don’t know what they’re talking about. If anyone ever says you can’t crop a photo, promptly forget everything they taught you and move on.
Cropping your photos in Lightroom and Photoshop can turn an okay photo into an absolutely stunning shot. This is because you can’t really see how an image is going to look through a camera. The viewfinder is often too small, and the screen on the back of the camera doesn’t have enough details to really give you a full understanding of the image.
So cropping will become necessary. I’m often off-center by at least a small margin on all of my images. As well, cropping will allow you to re-examine the image and look for new compositions in the scene. You can try out the Rule of Thirds, the Golden Ratio, or other compositions by pressing ‘O’ while in the cropping overlay. Hold shift and press ‘O’ to change the position of the guide in cases like the golden ratio.
But the best part about cropping your photos is that it’ll help you get better photographs the next time. While I do still crop my images, I crop them significantly less than I used to because I know what to look for to balance a scene.
5. Keep learning about photography
 If you’d like to learn more about Lightroom, I’ve made a massive guide to editing your photos like a pro here. And there are many more free articles and guides on this website that can help you learn the basics of photography. But when you’re ready to start upping your game, you can start by taking my free online webclass. This is a quick, 25-minute course bundled with a number of other guides that’ll teach you how to take professional-quality images with the gear you already own.